The Monarch Service Tool Gets An idErr Code. How Can You Do That?

Good day, everyone!
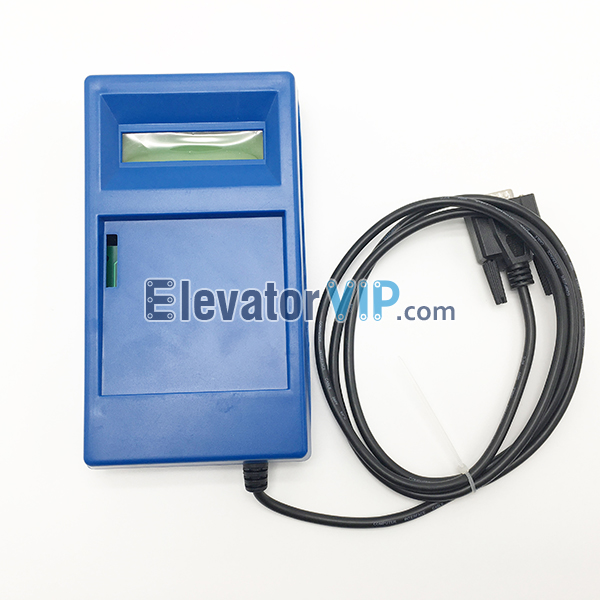
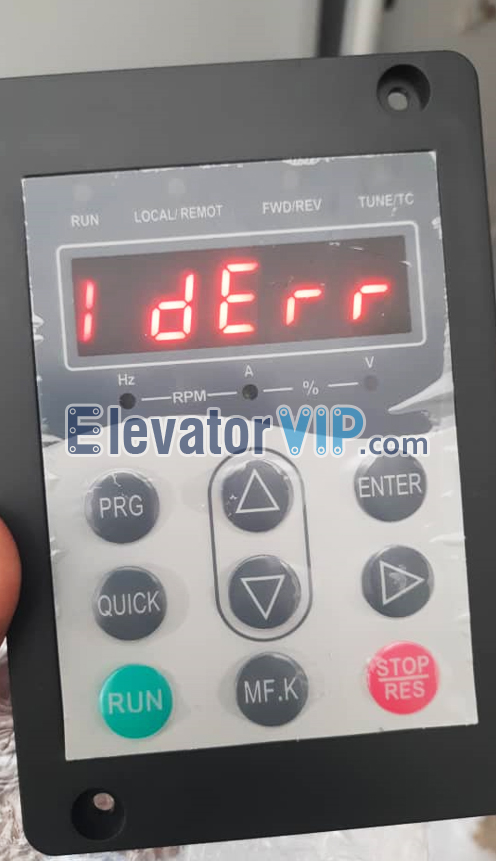
Today, ElevatorVip will share an experience of how to solve error code about monarch service tool, which is ‘idErr’ displays on your screen of monarch service tool.

MDKE6 Service Tool, Universal Monarch Keypad, Monarch Service Tool Error Codes, Monarch Test Tool idErr Code, Monarch Service Tool User Guide Video

Serval days before, one of customer said that he received parcel, but when he plugged in Monarch 3000+ drive there is showing ‘idErr’ code. He suddenly felt restless, then he asked us about how to solve the issue?

In that case, you should set parameter ‘F-9’, which the specific steps are setting the value of ‘F-9’ from ‘0’ to ‘1’ on the board at your jobsite, then use monarch service tool to set others, etc. For detailed solutions, please contact us, we will show you the video tutorial. Thank you!

By the way, here is a hyperlink of ordering monarch service tool in need: https://www.elevatorvip.com/product/monarch-step-elevator-service-tool-mdke6/

If The XIZI Otis Elevator ALMCB V4.2 PCB Is Locked by Password, How Can I do?

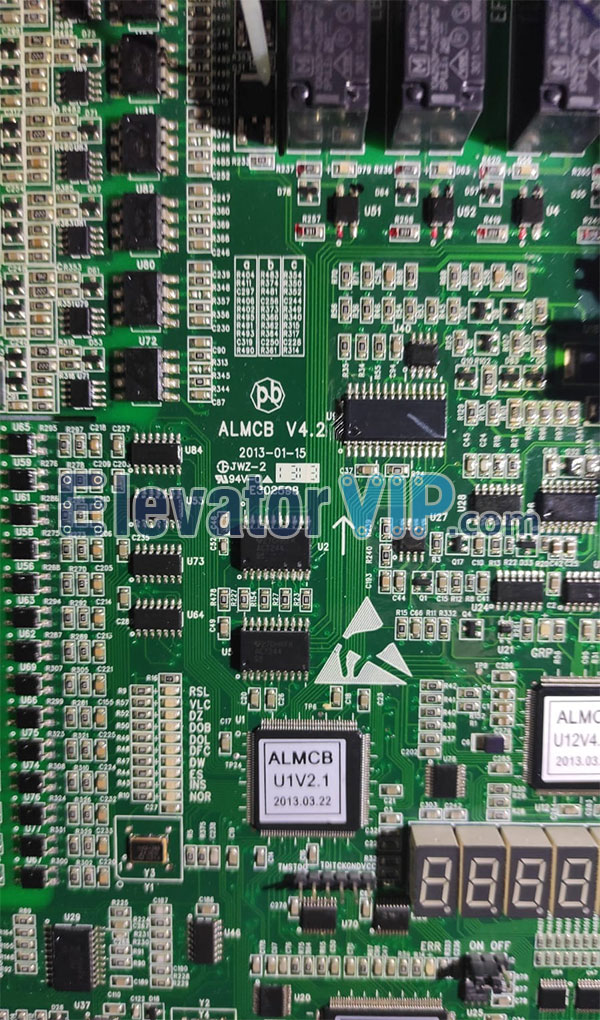
Recently ElevatorVIP has got a quotation from our customer in Panama City of Panama who’s Xizi Otis elevator integrated motherboard (ALMCB V4.2) is locked by some with password, and he can’t change or reset parameters, so has fallen into helplessness, what should he do, he asked us.


Don’t worry about that, ElevatorVIP has a Xizi Otis Elevator Decoder Tool to decode password for his jobsite. It is so easily for using, but it is very useful.


XIZI Otis Elevator ALMCB Board Decoder Tool, ALMCB2 Integrated Motherboard Decode Password, HAMCB PCB Password Decoder Tool, XIZI LMCB Motherboard Decoder, Otis Elevator Decoder Tool

If you are also stuck with it, please contact ElevatorVIP, thank you!

KONE Elevator Landing Push Button (LOP) Up and Down Used in Cape Town of South Africa

As we all know, KONE elevator is a world-famous elevator brand, which is widely used all over the world. So, the spare parts in the elevator are really valuable. Today, ElevatorVip will introduce a spare part of KONE elevator – Bicolor Push Button (Having two colors when push button works).

F2KFB1, F2KFB2, 772903H05, 772893H05, KONE Elevator Round Push Button, KONE Lift Push Button Red Lights, KONE Push Button Wire Cable, KONE Push Button cable F2KFB2 F2KFB1 4X60MM

F2KFB1, F2KFB2, 772903H05, 772893H05, KONE Elevator Round Push Button, KONE Lift Push Button Red Lights, KONE Push Button Wire Cable, KONE Push Button cable F2KFB2 F2KFB1 4X60MM


This is KONE bicolor push button used in Cape Town, South Africa, which is provided by ElevatorVip. If you need the same KONE push button (F2KFB1, F2KFB2), please contact ElevatorVip, thank you!

How to copy all of parameters from an old Monarch NICE3000 controller of Elevator to new one?

If you have multiple elevators with the same parameters setting of Monarch NICE3000 controller (MCTC-MCB-B), and you have finished the work of parameters setting for one of them. In order to save the tedious duplication of work, and don’t want to set parameters for next elevator go wrong. Okay, please let ElevatorVip teaches you how to copy parameters from an existing elevator to new one.

First step, connecting Monarch NICE3000 Controller and computer with programming cable.
Second step, launching the Monarch NEMS V2.4 Software
For detailed steps, please review the video tutorial as below:


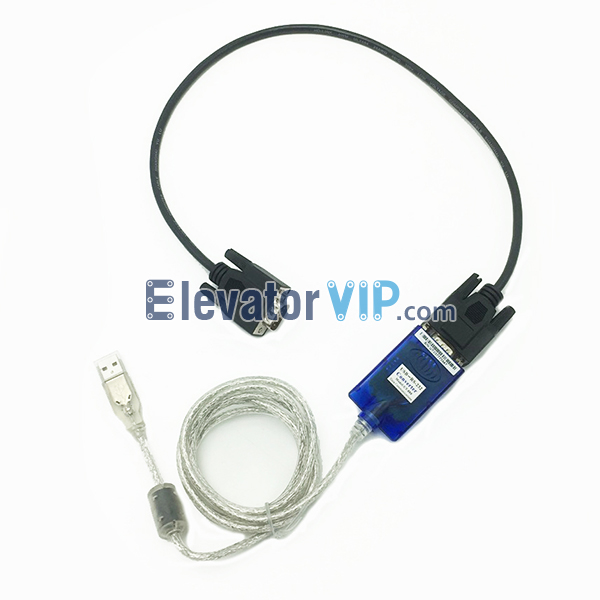
Monarch USB Programming Cable, NICE3000+ Programming Cable, NICE1000 USB Connecting Cable, NEMS V2.4 Software, MCTC-MCB-C2 Board Programming Cable, MCTC-MCB-C3 Programming Cable

Monarch Elevator USB Programming Cable

How to debug ThyssenKrupp escalator PCB ECT-01-A V3.0 when getting some faults?

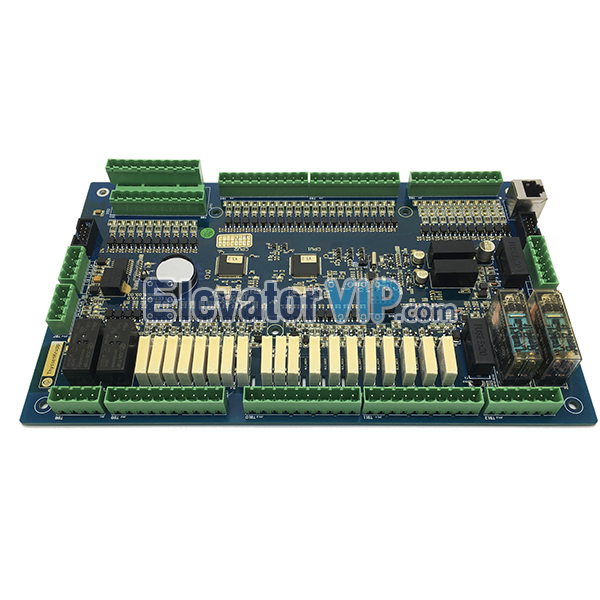
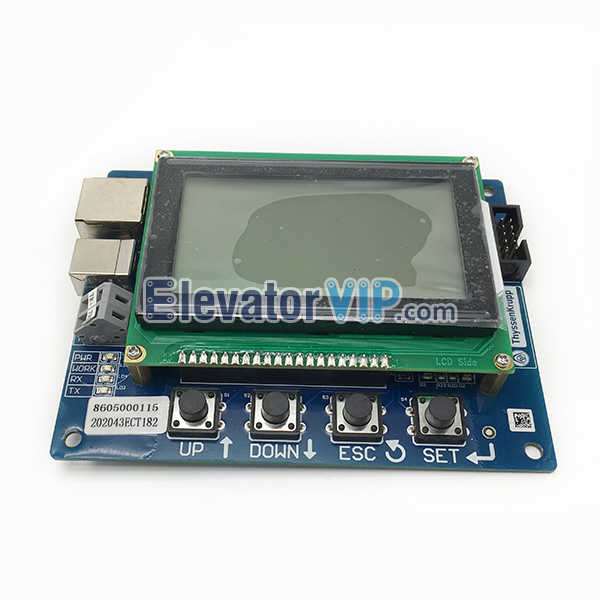
The ThyssenKrupp escalator PCB board (Model: ECT-01-A) is a extend motherboard for ThyssenKrupp escalator. But every spare part will meet a fault in running for a long period of time, especially the PCB board, today we are talking about how to debug the fault of ThyssenKrupp ECT-01-A board. First you should have an ThyssenKrupp escalator service tool (testing tool) likes below picture, it should be connected with ECT-01-A with electricity on. The faults will be displayed on the screen of service tool, then compare the fault code with operating manual, you’ll know exactly what the problem is, right?


ThyssenKrupp Escalator Diagnostic Board, ECT-01-A, ThyssenKrupp Escalator Control Board, Thyssen Escalator Expansion Mainboard, Escalator Diagnostic Board in India, ThyssenKrupp Escalator PCB Board Supplier

ThyssenKrupp Escalator Diagnostic Board (ECT-01-A V3.0)

ThyssenKrupp Escalator Service Tool, Thyssen Escalator Diagnostic Tool, ThyssenKrupp Escalator Test Tool, Thyssen Escalator Debugger, Thyssen Escalator Error LCD Display Card, ECT-01-D, ECT-01-A Board Testing Tool, Escalator Service Tool Supplier, Thyssen Escalator Testing Tool in India

ThyssenKrupp Escalator Service Tool


ThyssenKrupp Escalator / Moving Walk Control System ECT-01 V3.0 User Manual, Function and Faulty Codes (ECT-01-A PCB and ECT-01-D Service Tool)

More about questions do you want to know, please contact ElevatorVip.com, thank you!

How to Install Escalator Handrail Belt Properly with Handrail Belt Installation Pull Hook Tool?

Today ElevatorVip is going to teach you how to properly install the escalator handrail belt without any damage of handrail belt.
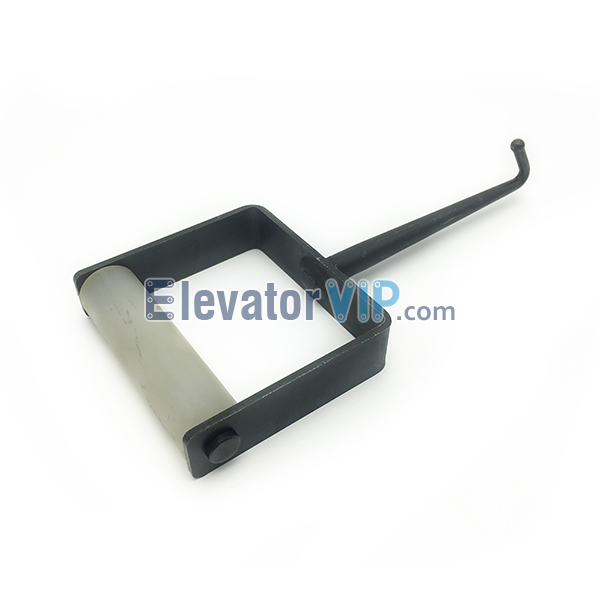
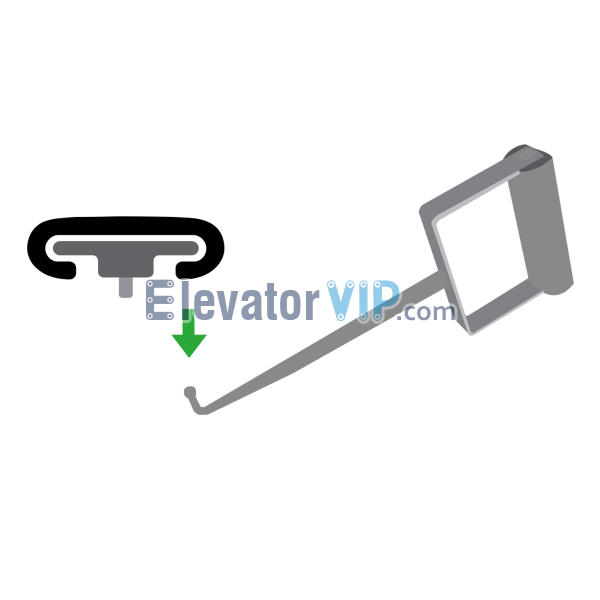
For installation of escalator handrail belt, the tool is very important. Escalator Handrail Belt Installation Tool (Handrail Pull Hook) is a tool used by service technicians to install escalator handrails. When used properly, this tool will eliminate damage to the handrail during the installation process.

Escalator Handrail Installation Tool, Escalator Handrail Pull Hook, How to eliminate damage to handrail during installation, XAA27BD1, Escalator Handrail Installation Tool Supplier, Escalator Handrail Installation Tool Manufacturer

Instructions of escalator handrail belt installation:

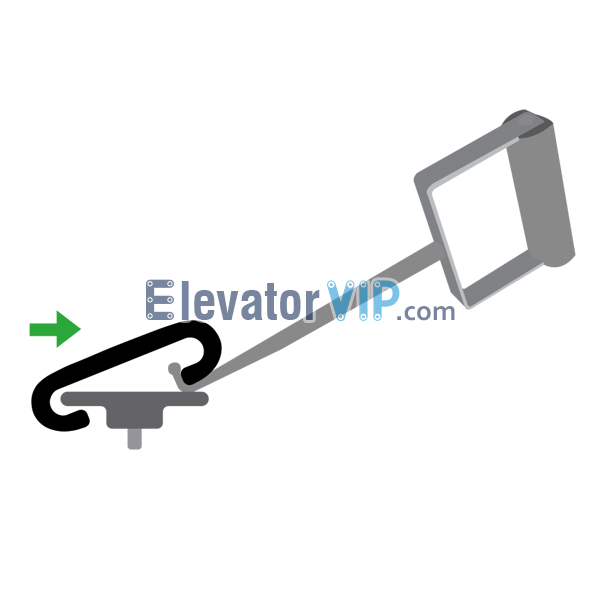
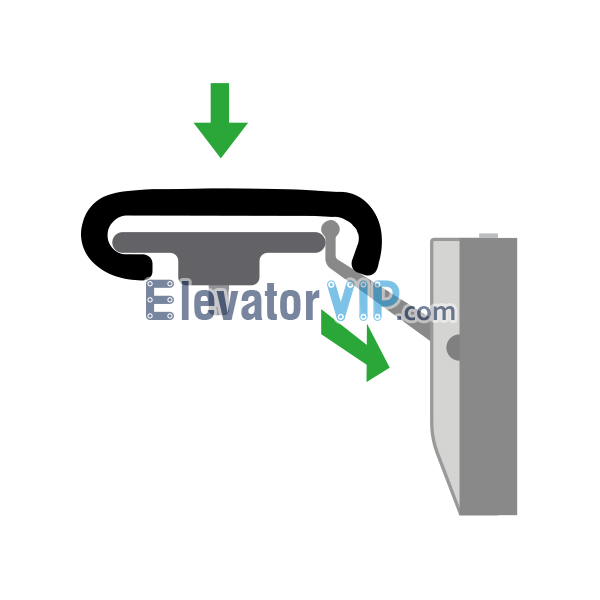
1) Hook outside lip of handrail onto guide, insert tool under handrail lip.
Escalator Handrail Belt Installation Tool, Escalator Handrail Pull Hook Tool, Moving Walks Handrail Belt Installation Tool

2) Pull down and out to position tool ball above lip and guide.

Escalator Handrail Belt Installation Tool, Escalator Handrail Pull Hook Tool, Moving Walks Handrail Belt Installation Tool

3) Apply pressure to handrail surface while sliding tool parallel with handrail and guide. Continue for length of handrail.

Escalator Handrail Belt Installation Tool, Escalator Handrail Pull Hook Tool, Moving Walks Handrail Belt Installation Tool

4) Remove tool.

Escalator Handrail Belt Installation Tool, Escalator Handrail Pull Hook Tool, Moving Walks Handrail Belt Installation Tool


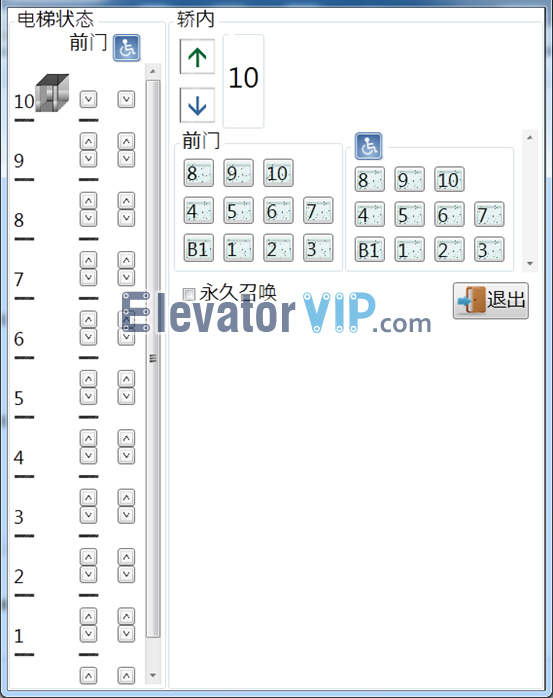
Mitsubishi KCD-911A PCB (CC Program) to Change the Floor Indication in COP

For example: Change ‘-1’ to ‘B1’

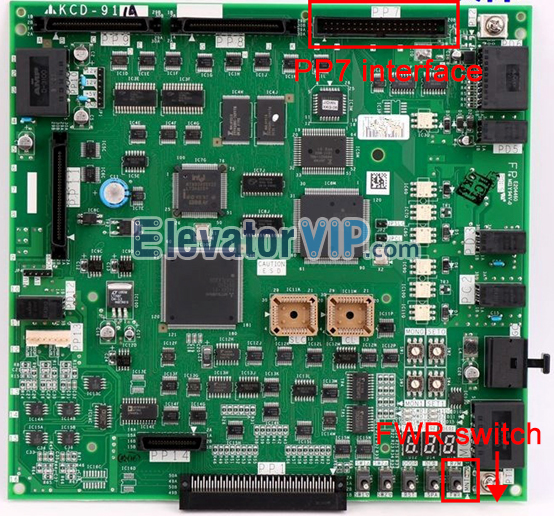
1) Keep the PP7 interface of KCD-911A board to connect MC interface of MC card by parallel ribbon data cable, and then USB interface of MC card to connect PC (or laptop) by USB cable.

Connection Schematic Diagram of Mitsubishi KCD-911A Board and MC Card

Connection Schematic Diagram of Mitsubishi KCD-911A Board, PC, and MC Card

2) Keep the model of KCD-911A board works in normal mode (Not writing mode, the 7-segment display doesn’t display ‘FLS’). Adjust SW1=1, SW2=0 potentiometer of MC card.
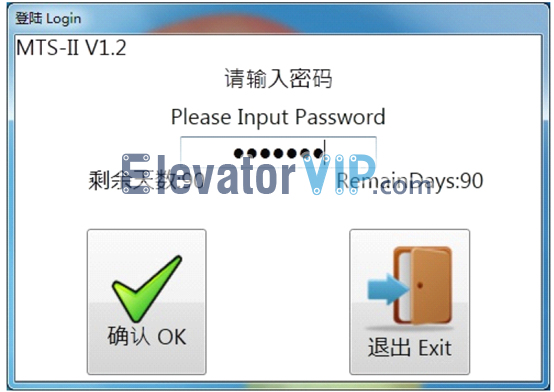
3) Launch the software ‘MTS-II’ (MC card software) on the PC (or laptop), input the password.

Mitsubishi Elevator MTS-II Software, Mitsubishi Elevator MTS Tool

Mitsubishi Elevator MTS-II Software

Mitsubishi Elevator MTS-II Software Login, Mitsubishi Elevator MTS Tool Passowrd

Mitsubishi Elevator MTS-II Software Login

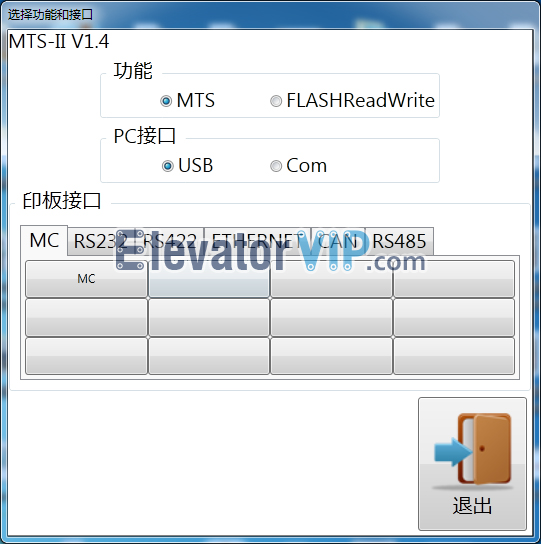
4) Select the ‘MTS’ radio button in Function block, and then select the ‘USB’ radio button in PC Interface block, also select ‘MC’ in the MC tab-page of PCB Interface block.

Mitsubishi MTS-II Software V14 MTS

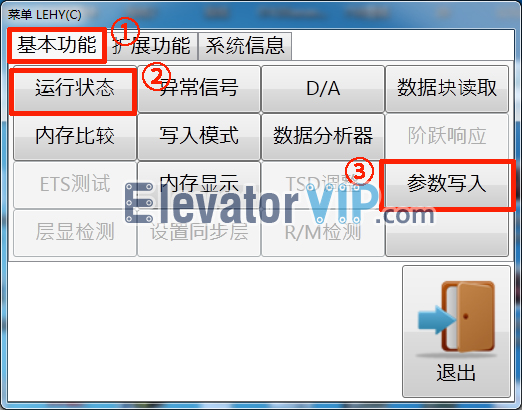
5) Click on ‘Running state’② in the Basic function tab-page①

Mitsubishi MTS-II Software_V14 Basic Function

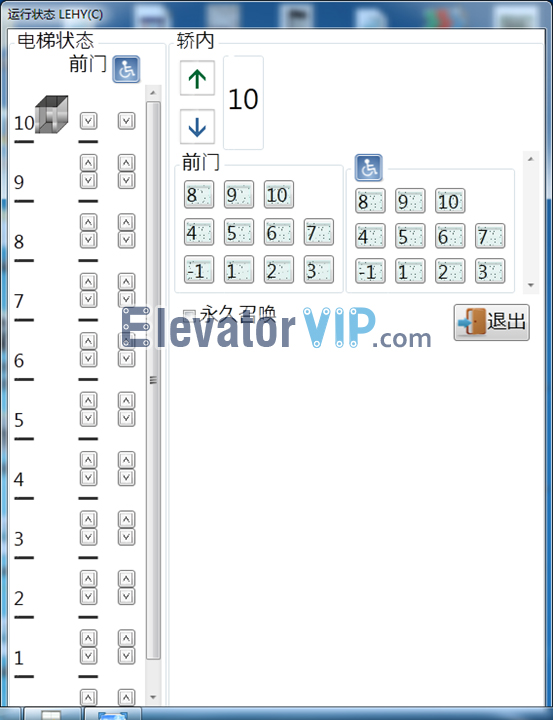
6) Check whether where is displaying ‘-1’ in the COP, if it is, exit ‘Running state’.

Mitsubishi MTS-II Software V14 Running State

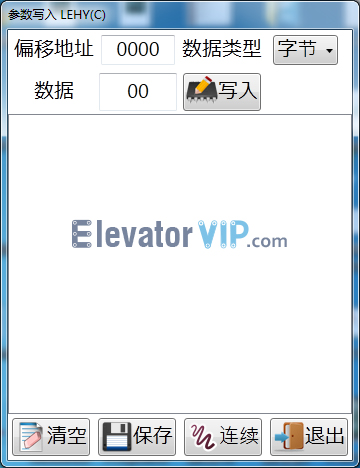
7) Click on ‘Write parameters’③ in the Basic function tab-page① to enter changing parameter mode

Mitsubishi MTS-II Software V14 Write Parameters

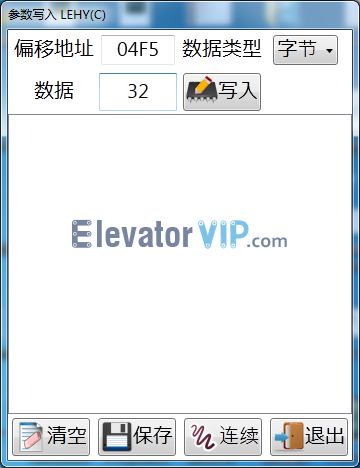
8) Input the offset address ‘04F5’ (this is the address where is ‘-1’ stored), then the value of ‘32’ (means ‘-1’) will be read auto automatically from memory.

Mitsubishi MTS-II Software V14 Write Parameters_02

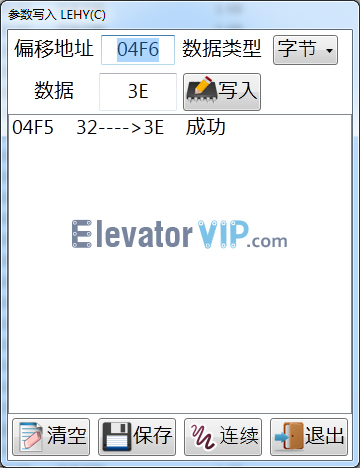
9) Input value ‘3E’ (means ‘B1’) into the data input box, click on save button, and then exit it.

Mitsubishi MTS-II Software_V14 Write Parameters 03

10) Check whether where is displaying ‘B1’ in the COP, if it is, successful.

Mitsubishi MTS-II Software V14 Running State 02

Tutorial on Two Methods of Program Copying Mitsubishi Elevator KCD-911A Motherboard by MC Card Tool (MTI-II Card)

1st of Methods: Through MC Card Tool (MTI-II Card) directly, without MST-II Software

Program reading of KCD-911A motherboard (Replicated motherboard)
1) Power off the elevator
2) Adjust SW1=3, SW2=0 potentiometer of MC card
3) One connector of parallel ribbon data cable of MC card to connect PP7 interface of KCD-911A motherboard, the other connector to connect MC card
4) Turn on the switch ‘FWR’ on the board (↓)
5) Power on the elevator, meanwhile, the program reading is in progress
6) If program reading finished, power off the elevator, and then pull off connector of parallel ribbon data cable from KCD-911A motherboard (The program has been read into the MC card)

(Attention: During program reading through MC card (MTI-II), the MTI indicator light starts flashing; After the program reading is finished, the MTI indicator light stops flashing, meanwhile FOK indicator light always on.)
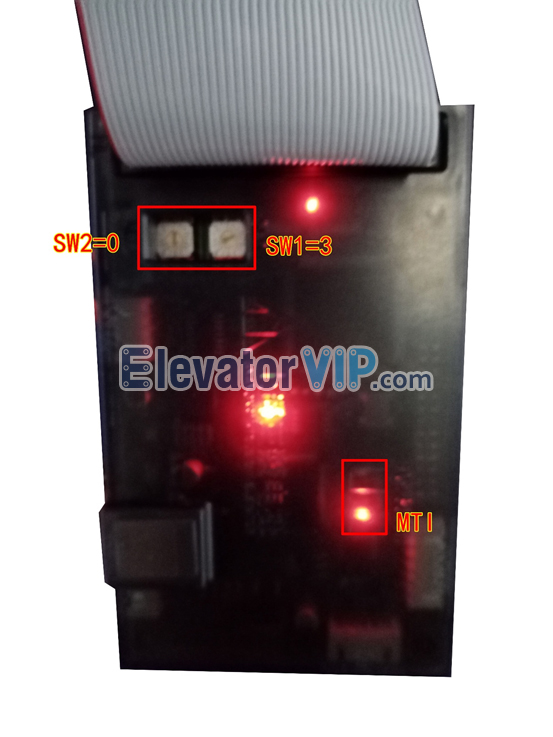
Mitsubishi Elevator MC Card MTI Indicator Light, Mitsubishi Elevator MTI Card Tool

Mitsubishi Elevator MC Card MTI Indicator Light
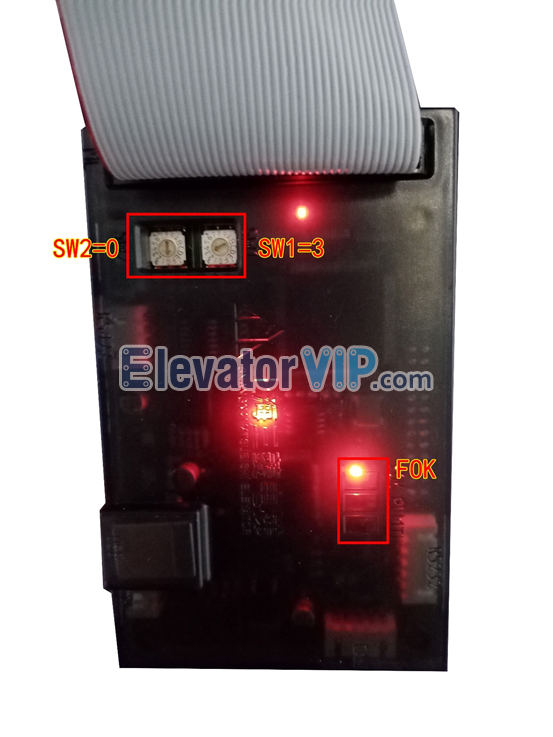
Mitsubishi Elevator MC Card FOK Indicator Light, Mitsubishi Elevator MTI Card Tool

Mitsubishi Elevator MC Card FOK Indicator Light

Program writing of KCD-911A motherboard (Targeted motherboard)
1) Power off the elevator
2) Adjust SW1=5, SW2=0 potentiometer of MC card
3) One connector of parallel ribbon data cable of MC card to connect PP7 interface of KCD-911A motherboard, the other connector to connect MC card
4) Turn on the switch ‘FWR’ on the board (↓)
5) Power on the elevator, meanwhile, the program writing is in progress
6) If program reading finished, power off the elevator, and then pull off connector of parallel ribbon data cable from KCD-911A motherboard


2nd of Methods: Through MC Card Tool (MTI-II Card) and MTS-II Software

Program reading from KCD-911A motherboard to PC (or laptop)
1) Keep the PP7 interface of KCD-911A board to connect MC interface of MC card by parallel ribbon data cable, and then USB interface of MC card to connect PC (or laptop) by USB cable.

Connection Schematic Diagram of Mitsubishi KCD-911A Board and MC Card

Connection Schematic Diagram of Mitsubishi KCD-911A Board, PC, and MC Card

2) Adjust SW1=1, SW2=0 potentiometer of MC card
3) Launch the software ‘MTS-II’ (MC card software) on the PC (or laptop), input the password.

Mitsubishi Elevator MTS-II Software, Mitsubishi Elevator MTS Tool

Mitsubishi Elevator MTS-II Software

Mitsubishi Elevator MTS-II Software Login, Mitsubishi Elevator MTS Tool Passowrd

Mitsubishi Elevator MTS-II Software Login

4) Select the ‘FLASHReadWrite’ radio button in Function block, and then select the ‘USB’ radio button in PC Interface block, also select ‘MC’ in the MC tab-page of PCB Interface block.
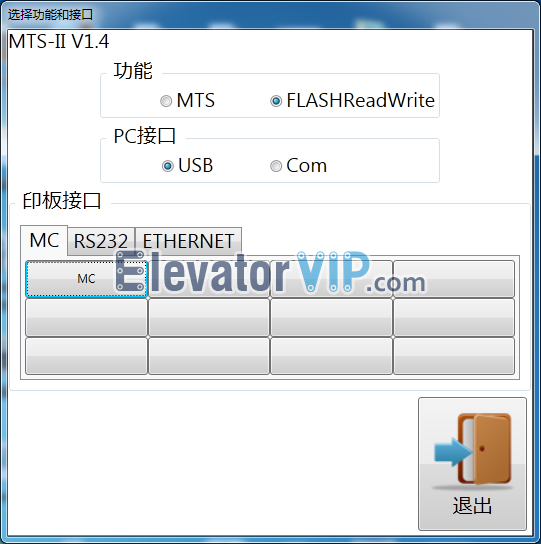
Mitsubishi Elevator MTS-II Software V.14, Mitsubishi Elevator MTS Tool MC Function

MC Mode of Mitsubishi Elevator MTS-II Software

5) Select the radio button ① (Read program from MTI card) in the reading tab-page; Select the save path ② where program file will be saved on the PC (laptop); Click on the start button to launch ③
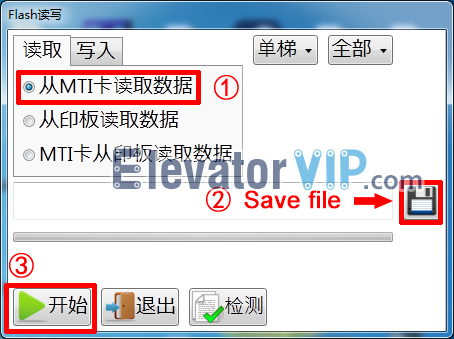
Saving file of Reading program by Mitsubishi MTS-II Software

Saving file of Reading program by Mitsubishi MTS-II Software

6) When the program reading is finished, there pops up a checking JDialog (Double to check whether the saved program on the PC (laptop) is consistent with board).
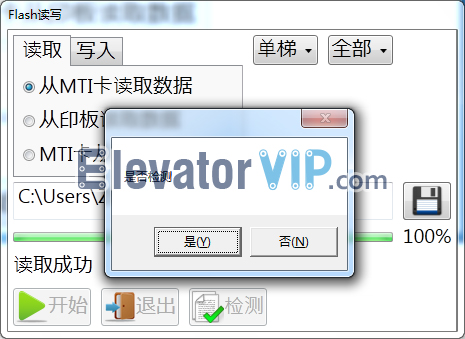
Checking Program Consistency by Mitsubishi MTS-II Software

Checking Program Consistency by Mitsubishi MTS-II Software

Program writing from PC (or laptop) to KCD-911A motherboard
1) Power off the elevator
2) Adjust SW1=1, SW2=0 potentiometer of MC card
3) Keep the PP7 interface of KCD-911A board to connect MC interface of MC card by parallel ribbon data cable, and then USB interface of MC card to connect PC (or laptop) by USB cable.
4) Turn on the switch ‘FWR’ on the board (↓)
5) Power on the elevator
6) Launch the software ‘MTS-II’ (MC card software) on the PC (or laptop), input the password.
7) Select the ‘FLASHReadWrite’ radio button in Function block, and then select the ‘USB’ radio button in PC Interface block, also select ‘MC’ in the MC tab-page of PCB Interface block.
8) Select the radio button ② (Write program into KCD-911A board) in the writing tab-page ①; Select the program file (saved by reading program step) to import into the KCD-911A board ③; Click on the start button to launch ④.
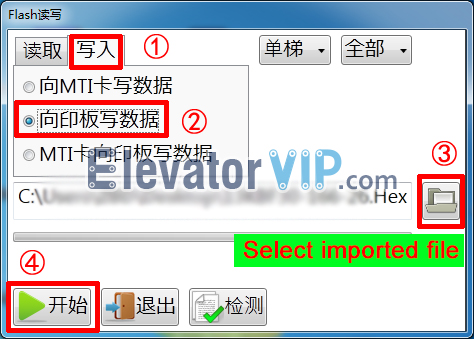
Import The Program by Mitsubishi MTS-II Software

Import The Program by Mitsubishi MTS-II Software

9) Program writing is finished
Program Copy Tutorial of Mitsubishi Elevator KCD-701C Motherboard by MC Card Tool

Program copy tutorial of Mitsubishi KCD-701C motherboard

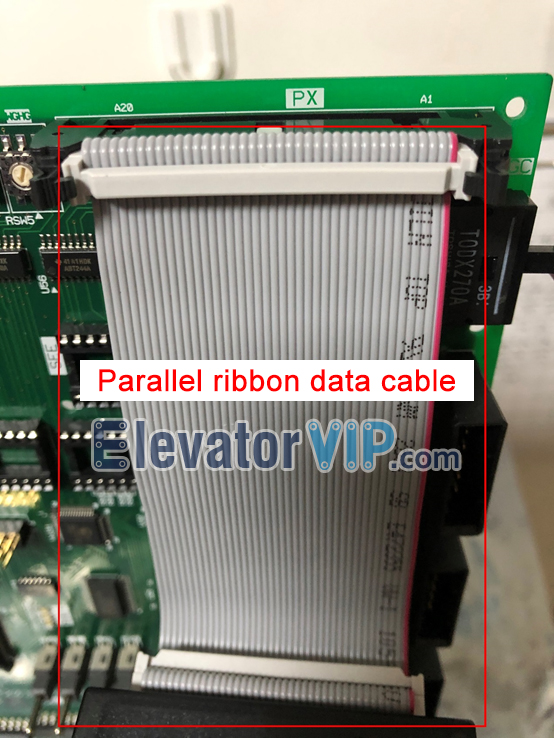
Parallel Ribbon Data Cable Used Between Mitsubishi Elevator MC Card and PCB Board

Parallel Ribbon Data Cable Used Between Mitsubishi Elevator MC Card and PCB Board

Mitsubishi Elevator MC Card Tool, Mitsubishi Elevator Program Copy Tool, Mitsubishi Lift Code Restore Device

Mitsubishi Elevator MC Card Tool

Program reading of KCD-701C motherboard (Replicated motherboard)
1) Power off the elevator
2) Adjust SW1=3, SW2=0 potentiometer of MC card
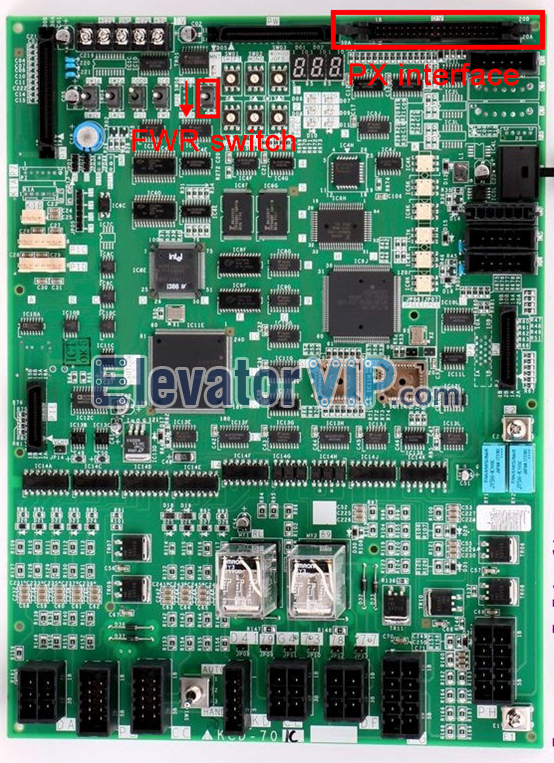
3) One connector of parallel ribbon data cable of MC card to connect PX interface of KCD-701C motherboard, the other connector to connect MC card
4) Turn on the switch ‘FWR’ on the board (↓)
5) Power on the elevator, meanwhile, the program reading is in progress
6) If program reading finished, power off the elevator, and then pull off connector of parallel ribbon data cable from KCD-701C motherboard (The program has been read into the MC card)

Program writing of KCD-701C motherboard (Targeted motherboard)
1) Power off the elevator
2) Adjust SW1=5, SW2=0 potentiometer of MC card
3) One connector of parallel ribbon data cable of MC card to connect PX interface of KCD-701C motherboard, the other connector to connect MC card
4) Turn on the switch ‘FWR’ on the board (↓)
5) Power on the elevator, meanwhile, the program writing is in progress
6) If program reading finished, power off the elevator, and then pull off connector of parallel ribbon data cable from KCD-701C motherboard

How to Restore Program of Mitsubishi KCD-1162B Board with MC Card (Service Tool) and MTS-II Software?

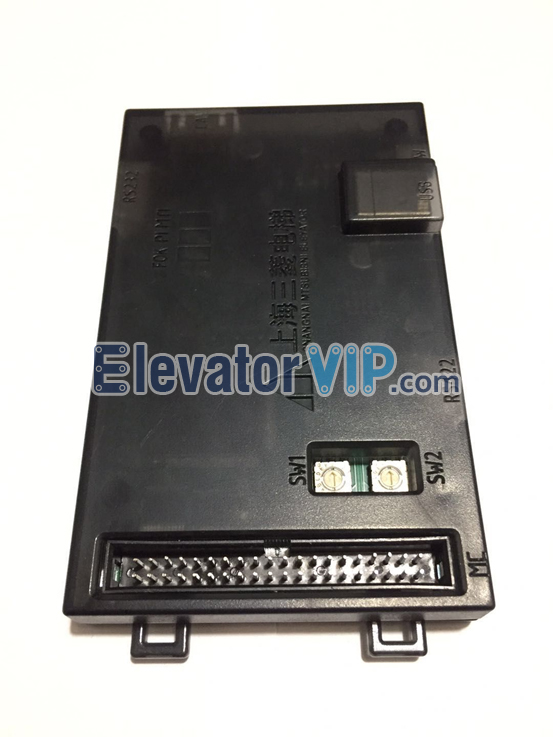
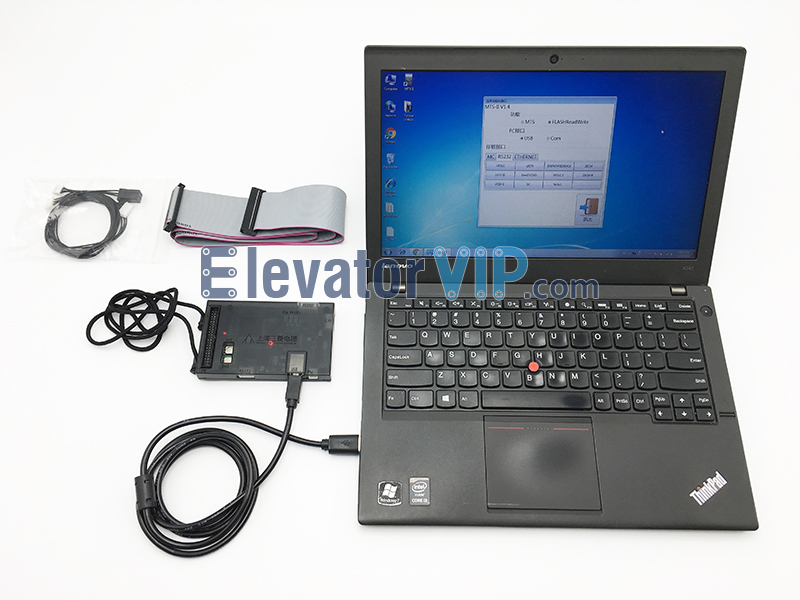
Mitsubishi Elevator MC Card Tool Schematic Diagram, Mitsubishi MC Card Tool Working Principle Diagram, How to use Mitsubishi Lift MC Card, How to Connect Mitsubishi Elevator MC Card Tool

Mitsubishi Elevator MC Card Tool Schematic Diagram

Reading program from old KCD-1162B board:

1) Keep the PP19 interface of KCD-1162B to connect RS232 interface of MC card, and then USB interface of MC card to connect PC with USB cable.
2) Adjust SW1, SW2 potentiometer of MC card at position ‘0’
3) Launch the software ‘MTS-II’ (MC card software), input the password.
4) Set KCD-1162B motherboard to enter the read-write mode: turn on both switches ‘FWR’ and ‘RST’ on the board, and check the indicator whether displays ‘FLS’
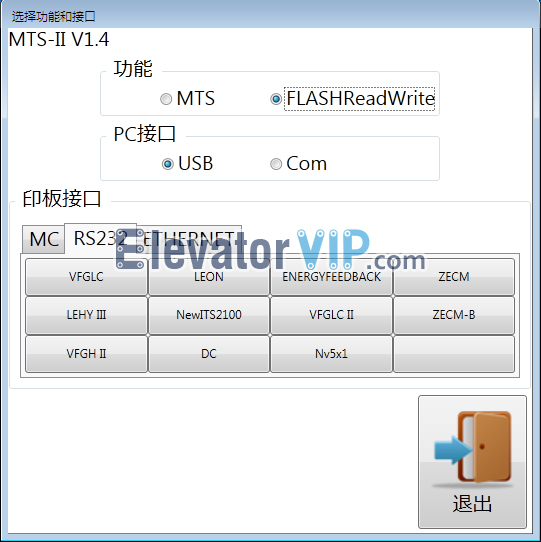
5) Select the ‘FLASHReadWrite’ radio button in Function block, ‘USB’ radio button in PC Interface block, and ‘RS232’ tab in the PCB Interface block
6) Double click on the ‘VFGLC’ button in the RS232 block of PCB Interface, select the ‘Reading Operation’ in the function block, and then click on the save file button to select a path to save the program file that is read from KCD-1162B board
7) Observe the number change of indicator on the board during reading, it is hexadecimal, and waiting for progress bar goes to 100%, if reading finished, the indicator whether displays ‘23F’, which means done, then exit the software.
8) Turn back the ‘FWR’ switch after program reading finished, it is important.


Writing program to new KCD-1162B board:

1) Keep the PP19 interface of KCD-1162B to connect RS232 interface of MC card, and then USB interface of MC card to connect PC with USB cable.
2) Adjust SW1, SW2 potentiometer of MC card at position ‘0’
3) Launch the software ‘MTS-II’ (MC card software), input the password. If this step is in need
4) Select the ‘FLASHReadWrite’ radio button in Function block, ‘USB’ radio button in PC Interface block, and ‘RS232’ tab in the PCB Interface block
5) Double click on the ‘VFGLC’ button in the RS232 block of PCB Interface, select the ‘Writing Operation’ in the function block, and then click on the open file button to select the file saved by reading operation, which means copy the program from old board to new board.
6) Set KCD-1162B motherboard to enter the read-write mode: turn on both switches ‘FWR’ and ‘RST’ on the board, and check the indicator whether displays ‘FLS’
7) Click the start button on the software to lunch the copy operation; Observe the number change of indicator on the board during writing, it is hexadecimal, and waiting for progress bar goes to 100%, then exit the software.
8) Turn back the ‘FWR’ switch after program writing finished, it is important.

By the way, the whole solution also can be used for program recovery of full series motherboards of Mitsubishi elevator, any question, please contact ElevatorVip soon.  

Mitsubishi Motherboard Program Restore Tutorial, Mitsubishi Board Program Backup, KCD-1162B Board Program Restore, Mitsubishi Service Tool, Mitsubishi MC Card, Mitsubishi PCB Board Program Read and Write, Mitsubishi Motherboard Testing Tool, Mitsubishi MTS-II Software, KCD-1162B Board Repair

Mitsubishi Motherboard Program Restore Tutorial, Mitsubishi Board Program Backup, KCD-1162B Board Program Restore, Mitsubishi Service Tool, Mitsubishi MC Card, Mitsubishi PCB Board Program Read and Write, Mitsubishi Motherboard Testing Tool, Mitsubishi MTS-II Software, KCD-1162B Board Repair